Developing a 'PowerVoice for Windows' Campaign
Assume we already have a list of names and telephone numbers that we are ready to create a 'Mission' for. Listed below is sample copy for our mission's script.
"Hi, this is XYZ company with an exciting new long distance offer just for you. If you would like to hear more information, please press the '1' key now, or you may press the '9' key on your touch-tone telephone to be added to our 'do-not-call' list. But realize, we are offering you a fantastic opportunity to get in on the low rate long-distance market. To find out how you can participate in this opportunity, simply answer a few questions and we can get you started. At the tone, please say your first and last name.
At the tone, please say your address.
At the tone, please say your city, state, and zip code.
Thank you, information will be rushed to you promptly. If you have any questions, feel free to call us at 218-568-5656. Good-bye."
The first thing that we must do is to determine what campaign we must use. (Campaigns are clearly described in the user manual.)
After reviewing our hypothetical script, we decide to select Campaign #4 because we will be asking multiple questions.
First, we must enter the 'System Settings' screen.
We will configure the 'Scheduler' and set what days of the week and times we want our message to go out.
Set Line 1 to Campaign #4.
Set Lines 2 & 3 to 'NO'.
Set Line 5 to 'YES' - we want the caller to press the '1' key, if they want more information.
Set Line 6 to '3' - because we will be asking 3 separate questions as part of our script.
Set Line 7 to 'RECORDING' - because we want for a voice response from the people that we reach.
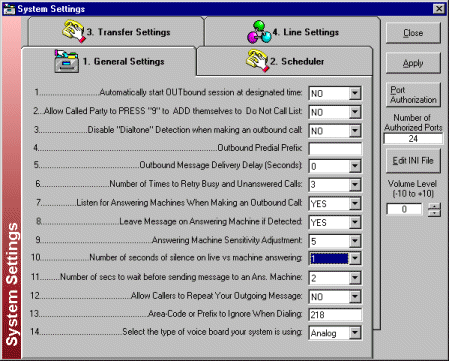
Next, we will go to the 'General Settings' tab.
Set Line 1 to 'NO' (the default) because we want to start the session ourselves.
Set Line 2 to 'YES' because we want to give people the opportunity remove themselves
from
the call list.
Set Line 3 to 'NO'.
Leave Line 4 blank because it isn't necessary to dial anything prior to dialing each number on the list. Generally, this box is used in situations where a '9' or other number(s) must be dialed to get an outside line (ie. They have a phone system connected to their phone lines). If our list of numbers requires a '1' to dial long distance, then we would place a '1' here. Or, if we decided that we wanted to block caller id, we would place '*67' in this field.
Set Line 5 to '0' because our message will be delivered as soon as someone answers the phone.
Set Line 6 to '3' because this is the maximum number of times we will attempt to reach this number.
Set L '7' to 'YES' in case we don't reach a live person. The system can go ahead and leave a message on an answering machine.
Leave Line 8 set to 'YES'.
Line 9
Set Line 10 to '2'. This '2' represents the amount of time we want our program to wait before delivering our message after the answering machine we reached quits speaking and played its tone.
Set Line 11 to 'NO', because we don't want to give the called party the option to repeat the message.
Enter '218' in the box for Line 12. Our list of numbers already has the area code '218' in the numbers, and we don't want to dial this number because we are in an area that uses only 7 digit dialing.
Set Line 13 'ANALOG' because this is the type of voice board we are using in our system. The DIGITAL option is selected only if a T1 (digital) voice board is used.
On the 'Line Settings' tab we will set only one line for outbound because we only have a small list of numbers to call. Otherwise we would have more outbound lines than numbers to call. In this type of situation, the system will automatically shut down because when the last line goes to grab a number, and one is not available, the system assumes that it has completed its mission and shuts down.
We do not have to make any changes to the 'Transfer Settings' tab because we are using Campaign 4 for our dialing campaign. If we had selected Campaign 5 or 6, we would then have to make our changes accordingly.
----------------------------------------------------------------------
Now we must go to 'Modify Groups'.
First, we must click-on 'Reset Outbound Dialing List'. This removes the current dialing list and adds the new one.
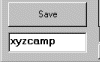
Next, we will create a new group so we will have a group to work with. To accomplish this, click-on the 'Create New Group' button.
Then, type the name of the new group and click-on 'Save'.
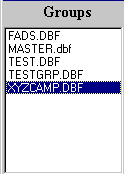
A new group in the 'Groups' field will now be created.
--------------------------------------------------------------------------
There are several ways of loading our Phone List.
--------------------------------------------------------------------------
Our group currently has no numbers in it. Since we have only several numbers enter, we will type them in manually.
Click-on the 'Add' button so we can begin to type in our phone list(be sure to first highlight the group). A box pops up where we can begin typing in our information. By repeatedly clicking-on 'Add New', we can continue to add numbers until we are completed with our phone number list.
Click-on the name of the group in the 'Groups' field, then Click-on 'Add Group to Dialing List' button. This brings up a confirmation box that asks if we now want to add the group to the dialer. Click-on 'YES'. This brings up another confirmation box that informs us that the entire group has been added to the dialing list.
To confirm that our list has been added - close the modify groups page, then go to 'View/Modify Dialing List'.
--------------------------------------------------------------------------------------------
Our last remaining task is to go to the 'Recording Studio' and record our messages.
First we must select the group we will be working with so the messages we record will be associated with that group.
Note: Because we selected 'Campaign 4' we have five messages to record, our live message, machine message, and 3 questions (i.e. ques1).
To record the messages, all we have to do is click-on the message we want to work on. Click-on 'Record' and speak into the microphone begin recording. After we're satisfied with each of the recordings, click 'Save To' and type in the name of the file.

We are now ready to run our campaign.
[Click
Here] to return to PVoice for Windows FAQ